

Upgrading or replacing your CPU fan is essential for maintaining optimal system performance and cooling. However, before purchasing a new fan, you need to know its size to ensure proper compatibility with your computer case and CPU cooler.
“Measure CPU fan size by checking the width diagonally across the blades. Fan sizes are usually in millimeters like 120mm or 140mm.”
In this article, We will discuss “ how to measure CPU fan size”
Table of Contents
Why Measuring CPU Fan Size is Important:
The size of a CPU fan plays a significant role in cooling efficiency, airflow, and compatibility. A fan that’s too small might not provide enough airflow to keep your CPU cool, leading to overheating and performance throttling. Conversely, a fan that’s too large may not fit into your case, leading to installation issues.
Here are a few reasons why measuring the fan size is crucial:
- Cooling Efficiency: Larger fans generally move more air, helping to cool down your CPU more effectively. However, they may not fit all cases.
- Noise Levels: Larger fans can provide better airflow at lower RPMs, reducing noise compared to smaller fans.
- Compatibility: Fans come in different sizes, and not all cases can accommodate larger ones. Measuring ensures the fan will fit properly within your system.
- Mounting Holes: Fan sizes affect the mounting hole placement on the CPU cooler or case. Proper measurements ensure that the mounting holes align perfectly.
Understanding the importance of fan size can help you make an informed decision when upgrading or replacing a CPU fan. Let’s dive into the process of measuring the fan size accurately.
Tools Needed for Measuring CPU Fan Size:
Before you start measuring, gather the following tools:
- Ruler or Measuring Tape: A ruler with millimeter (mm) markings is ideal, as most fan sizes are listed in millimeters.
- Screwdriver: You may need this to remove the fan if it’s tightly mounted to the CPU cooler or case.
- Notebook/Phone: To note down the measurements.
Once you have your tools, you can begin measuring.
Step-by-Step Guide to Measuring CPU Fan Size:
Turn Off and Unplug the Computer:
The first step in any hardware upgrade or maintenance is to ensure your computer is completely powered off and unplugged from the power source. This eliminates the risk of electric shock or damage to components while you work inside the case.
Also Read: Oc Is Not Supported CPU – A Guide For Gamers And Enthusiasts!
Open the PC Case:
Depending on your case type, you’ll either need to unscrew the side panel using a screwdriver or remove it by sliding it off. Once open, you should have access to the CPU cooler and the attached fan.
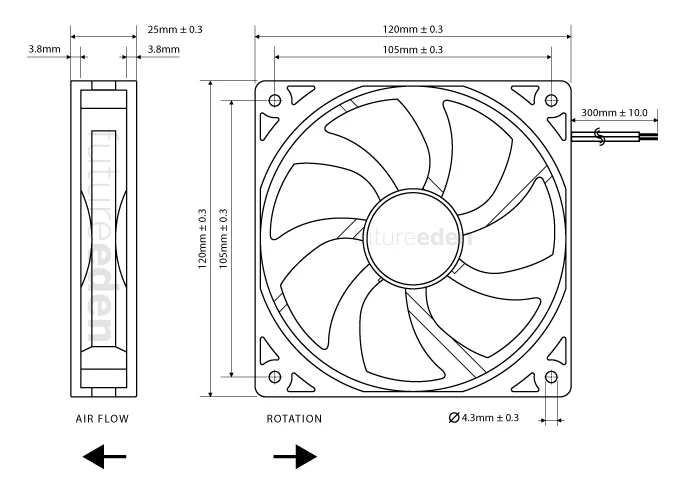
Measure the Fan Diagonally Across the Blades:
The fan size is determined by measuring the distance from one corner of the fan frame to the opposite corner (across the blades). For accuracy, place the ruler or tape measure diagonally from one edge of the fan to the opposite edge.
Fan sizes are typically listed in millimeters (e.g., 80mm, 92mm, 120mm, 140mm), so make sure to record the measurement in millimeters.
The most common sizes are:
- 80mm : Small fan often found in compact builds.
- 92mm : A mid-range size, often used in smaller desktop setups.
- 120mm : The most common size, balancing airflow and noise.
- 140mm : Larger fan, offering higher airflow with lower RPM and noise levels.
Measure the Thickness (Depth) of the Fan:
In addition to the diameter, fan thickness is another critical factor to consider, especially if you’re working with limited space in your case. Most CPU fans have a standard thickness of either 25mm or 30mm.
To measure thickness, place the ruler along the side of the fan to check the distance between the front and back edges. This measurement ensures the fan will fit correctly inside the case or CPU cooler housing.
Check Mounting Hole Spacing:
Fan sizes are directly tied to the placement of mounting holes, which are used to secure the fan to the CPU cooler or case. Measuring the distance between these holes will confirm whether the new fan can be mounted securely.
Measure the space between two adjacent holes on the fan’s frame, and check that the replacement fan you are considering has the same mounting hole pattern. This avoids potential issues with fan installation.
Common Fan Sizes and Their Benefits:
Different fan sizes offer varying benefits based on your system’s needs. Here’s a quick rundown of the most common fan sizes and what they offer:
- 80mm Fans: These are typically used in compact or older systems with limited space. They provide adequate cooling for small builds but may generate more noise due to higher RPMs.
- 92mm Fans: These fans are a step up from 80mm in terms of airflow and noise management. They are often used in mid-sized cases and CPU coolers.
- 120mm Fans The most popular fan size, 120mm fans provide a balance between airflow, noise levels, and compatibility. They fit most modern cases and are widely available in different RPM and airflow configurations.
- 140mm Fans: These larger fans are preferred for high-performance systems. They can move more air at lower RPMs, offering better cooling with less noise. However, they require more space and may not fit all cases.
Choosing the Right Fan Based on Your Measurements:
Once you have your measurements, it’s time to choose the right CPU fan. Keep the following factors in mind:
Also Read: Why Does My CPU Fan Start And Stop – Complete Overview!
Airflow (CFM):
A higher cubic feet per minute (CFM) rating means more air is moved through the fan. Larger fans typically have higher airflow, which is important for keeping your CPU cool under load. Airflow (CFM) refers to the amount of air a fan can move, measured in cubic feet per minute. A higher CFM rating is crucial for maintaining cooler temperatures, especially during intensive tasks or gaming sessions.
Noise Levels (DBA):

Larger fans can run at lower RPMs while moving the same amount of air as smaller fans, making them quieter. If noise is a concern, look for fans with lower RPMs or adjustable speed settings. Noise levels (DBA) indicate how loud a fan will be during operation. Fans with lower DBA ratings are quieter, and larger fans often generate less noise while maintaining good airflow, especially when running at lower RPMs.
Fan Speed (RPM):
The revolutions per minute (RPM) affects the noise and airflow. Fans with higher RPMs move more air but can be louder. Fan speed (RPM) determines how fast the fan spins, impacting both cooling performance and noise levels. Higher RPM fans move more air for better cooling but tend to generate more noise, while lower RPM fans offer quieter operation.
Power Connection Type:
Most modern CPU fans use either 3-pin or 4-pin connectors. Make sure the fan you choose is compatible with your motherboard’s fan headers. Power connection type refers to how the fan connects to the motherboard, with 3-pin and 4-pin connectors being the most common. Ensure that the fan you select matches your motherboard’s headers to enable proper power supply and control features.
Also Read: Do I Need Two CPU Power Cables – A Complete Guide!
How to Install a New CPU Fan:
Once you’ve chosen the right fan, follow these basic steps for installation:
- Remove the Old Fan: Use a screwdriver to carefully unscrew the old fan from the CPU cooler or case. Disconnect the power cable from the motherboard.
- Install the New Fan: Align the mounting holes of the new fan with those on the CPU cooler or case. Secure it with screws, ensuring a snug fit.
- Connect the Power Cable: Plug the new fan’s power cable into the appropriate fan header on the motherboard (usually labeled CPU_FAN).
- Test the Fan: Power on your PC to ensure the fan is working correctly and that it’s spinning without any issues.
FAQ’s
1. How do I measure the size of my CPU fan?
Measure diagonally across the fan blades from one corner to the opposite corner. Record the measurement in millimeters.
2. Why is it important to measure CPU fan size?
Accurate measurements ensure the fan fits in your PC case and provides the necessary cooling performance for your system.
3. What tools do I need to measure a CPU fan?
You need a ruler or measuring tape, preferably with millimeter markings, and a screwdriver to access the fan if needed.
4. What are common CPU fan sizes?
The most common fan sizes are 80mm, 92mm, 120mm, and 140mm.
5. Should I also measure the fan’s thickness?
Yes, fan thickness (usually 25mm or 30mm) is important to ensure it fits properly in your case or cooler.
Conclusion
Measuring your CPU fan size is crucial for ensuring proper cooling and compatibility with your PC case. By measuring diagonally across the fan blades and noting the thickness, you can find the right replacement or upgrade. Accurate sizing helps maintain optimal airflow and system performance.